Setting up Jekyll blog on Webfaction using git
So, in my last blog, I said I was using Jekyll to blog now. I also got a new host in Webfaction. So I figured I’d blog about how squished these two together into some blogging without your hands leaving the keyboard. This post will assume you know the basics about Jekyll and git.
1. Upgrade RubyGems and install Jekyll
To install the latest Jekyll on Webfaction, you’ll need to upgrade the version of RubyGems to at least 1.3.7. There’s instructions here for doing that, but I’m going to include them here for you lazy lazers.
It basically involves setting up some Ruby variables, and downloading, extracting and installing the new RubyGems packages.
export GEM_HOME=$HOME/gems
export RUBYLIB=$HOME/lib
export PATH=$HOME/bin:$PATH
wget http://production.cf.rubygems.org/rubygems/rubygems-1.8.10.tgz
tar xvzf rubygems-1.8.10.tgz
ruby setup.rb install --prefix=$HOME
gem install jekyll
This will install the gem command in $HOME/bin, and then install the latest version of Jekyll.
2. Install Pygments (optional)
Pygments is a Liquid Extension for Jekyll that will highlight code blocks. If you don’t need code highlighting, it’s not something you need, but if you do it will give you some of the nice formatting you see on this website.
Installation is as follows:
mkdir $HOME/lib/python
easy_install --always-unzip --install-dir=$HOME/lib/python --script-dir=$HOME/bin Pygments
3. Create static application in Webfaction
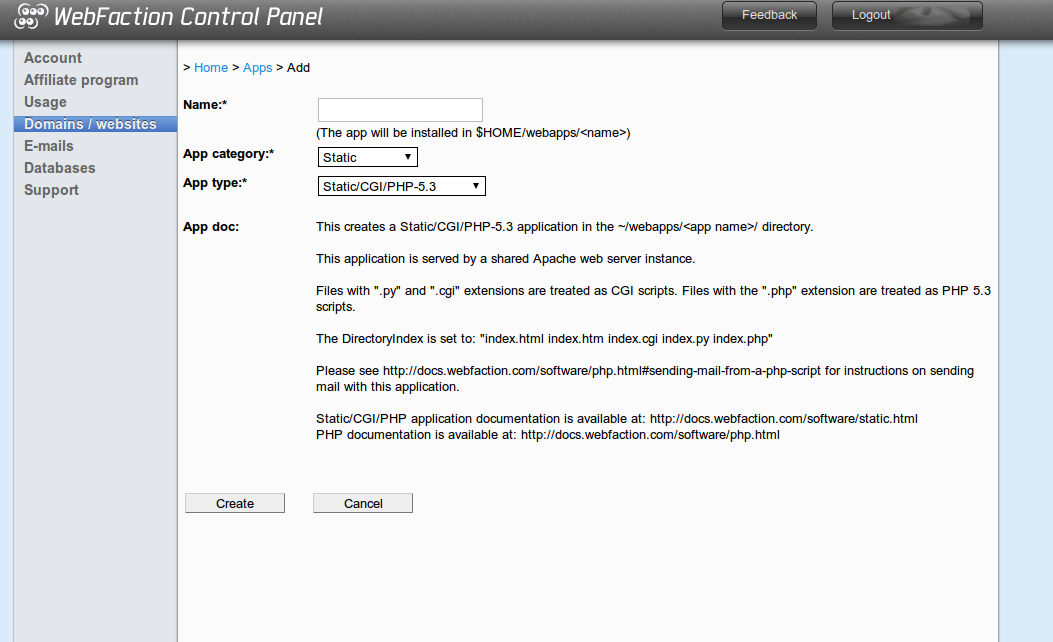
In your Webfaction control panel, setup a static web application, as shown below. Remember the name of the application, as that folder is where you’ll output your blog.

4. Set up git on Webfaction and your computer
On your webserver, create two directories. One will contain a bare git repository, and the other will contain the actual source of your blog (some info on a bare repository can be found here. I used ~/gitwebsite/git and ~/gitwebsite/ronalleva.com respectively. The rest of these instructions will assume those directories.
Inside ~/gitwebsite/git run:
git init --bareNow on your own computer, in your git repo for your Jekyll website, run
git remote add web ssh://username@username.webfactional.com/home/username/gitwebsite/gitThis will add the repo on your Webfactional server as a remote. Make sure you change username with your username, and the path /gitwebsite/git to whatever you happen to call it.
Now run:
git push web <master>and that will now push any of your committed changes to your webserver! Woohoo. Oh, and you’ll only need the master call the first time you do it, otherwise it won’t know what branch you’re trying to push. All subsequent calls won’t need the master.
5. Create a post-receive hook
Well, this is great. You’re pushing all your code to your webserver. But it’s sitting there, inert and useless like a sleeping kitten. You’re going to need to run the Jekyll command on your source to get it to show up right. There’s probably one million ways to do this (including doing it manually, using the at daemon, or setting up some type of Rube Goldberg device), but I like doing it with a post-receive hook.
Create a file called ~/gitwebsite/git/hooks/post-receive and place something like the following in there:
The first part basically sets up the necessary variables for working. The GIT_WORK_TREE variable is basically where your Jekyll files will end up. git checkout -f will checkout your Jekyll files into GIT_WORK_TREE. Then the Jekyll command is run, using the webapp you set up previously as the output directory. I put this in a gist, messing up the color style of my website, just so you could fork it! My kindness knows no bounds.
These instructions should be able to be adapted for any web host that allows for shell access (one of the great things about Webfaction). You can find the source of my blog at Github.